
Contact
- Email: [email protected]
Table
- Prerequisites
- Summary
- PC Prerequisites
- Linux Terminal Steps
- qemu-units installation
- .OVA Convert Section 1
- .vmdk Convert Section 2
Prerequisites
- Have a Virtual Machine install
- Have Kali install
Summary
This tutorial allows you to convert ova and vmdk virtual machines to qcow2 to used it in environments that used qcow2 format as VMs.
| Type of VMs | Description |
|---|---|
| VM | Stand for Virtual Machine |
| name.ova | The .ova file is one type of VM extension mainly used in Virtual Box or VMware. |
| name.vmdk | The .vmdk file is one type of VM extension mainly used in VMware and it have two extra files with it .ovf and .mf |
PC Prerequisite
- Make sure that if any
diskwas mounted to the VM that is removed from thedevice settingon theVirtual Machineprogram (Virtualbox,VMware) and that thedisplay settingis set toautosince I have seen that give problem when the resolution is set to a specific resolution. Any extradevicethat was mounted needs to beremovetoo.
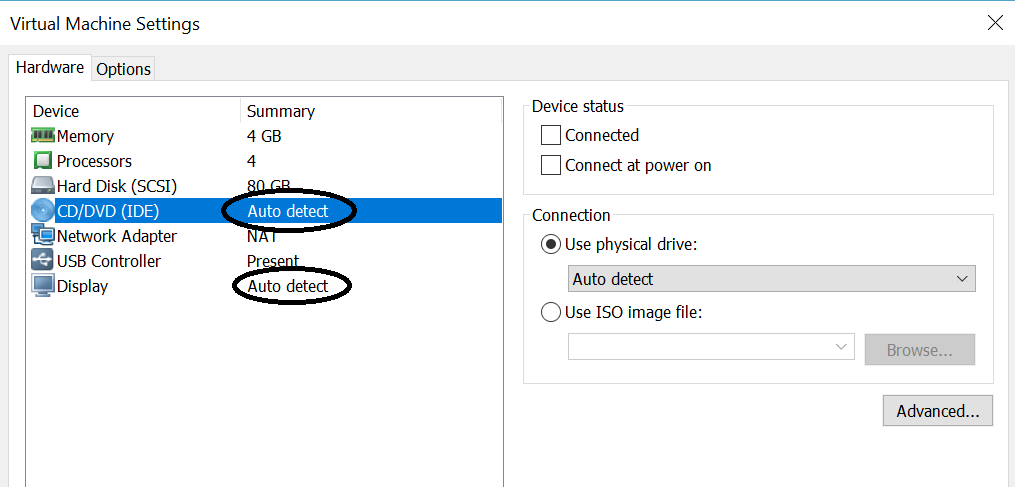
- First make sure the
VMispower off. - On
VMwareright click on theVMyou want toconvertandclickonsetting. - Then make sure that
CD/DVD (IDE)is set toAuto detect. - Then make sure that
Displayis set toAuto detectas well.
- On
Virtualboxgo tosettingon thetop left area of the program. - Then go to
storageand make sure isemptylike the picture bellow. - Here as long as you
did not changethedisplay settingthat should be ok if you did set todefaultagain.

Start the Conversion on a linux (Ubuntu,Kali,Other) Terminal
- First step is to export the machine you want to convert to either
| VM Formats to conversts |
|---|
| vm.ova |
| vm.vmdk |
- Make sure that the VM file you want to converts is on the a Linux machine that have qemu.utils install to make it easier to convert the vm.
Make sure qemu-utils are install
- To make sure you have qemu-img install.
- open terminal
- type
qemu-imgand pressenter - you should get sometime alone the line of
qemu-img: not enought argumentsthis will let you know that qemu-utils are install on your linux computer - otherwise on the same
terminalrunsudo apt-get updateafter that is done runsudo apt-get install qemu-utils - Next step is to
navigatesto thefolderthat have theVM you exportedand want toconvert. - if you have
vm.ovafollowsection 1otherwisego tosection 2
Section 1
- Here is how to
extracta.ovato.vmdkso you can continue onsection 2
- After navigating to the folder run
tar -xvf inputVM.ovatheVM.ovawould be the name of your vm that you want to covert so that might vary for you VM. - This might take a
whiletodecompressdepending on thesideof thevm. - This will give you the
.ovf.mf.vmdkthat you need to convert now you can move tosection 2


Section 2
- Here is the step to convert .vmdk to .qcow2
- First step when you have the
VM.vmdkis to run theqemu-imgcommand to convert from.vmdkto.qcom2 - Open terminal and
navigate to the folderthat have theVM.vmdkyou want toconvert.

- Then run the command
qemu-img convert -O qcow2 inputVM.vmdk outputVM.qcow2. - This
will take some time depending on the size of the VMandcomputer processing power.

